




m-Commerce and In-App Messaging Campaigns, Why Use Localytics?
It really goes without saying (but I’ll say it any way) that m-commerce is one of the fastest growing and unique channels of any retailer’s engagement initiatives with their buyer. With this rapid adoption, especially in commerce, it is vital that your marketing campaigns be more engaging and relevant to mobile users than ever before (especially considering you have a 97% read-rate, WHY WOULDN”T you want them to be??).
Today we’re going to be discussing how you can go about setting up campaigns that won’t just get people to “feel good” about your brand, but plainly – make you more money.
First and foremost, before you even THINK about getting into this type of campaign building and strategy, you need a service that will allow you to deliver the messages you will be creating. Localytics is one of these services that allows you to send rich, customized messages, specifically crafted for individual audience segments directly based on your analytics data. Because it is based on your user segments and in-app triggers, you are able to refine the experience to best suit the right audience rather than a broad-stroke, non-targeted, campaign.
So let’s get started.
1) Tag the App and Build the Segment
(assuming you have Localytics or something similar)
As you’re working through the Localytics implementation, create an event for “item added” to shopping cart, your application likely has a way to track this already. This event will track how often items are added to the user’s shopping cart. You will also likely want to add a couple relevant bits of information about that “item added” e.g. item name, value, quantity. Then, using the same approach used to create the “item added” event, you’ll create an event for “check out successful”. This event will track each time a user successfully completed the order process.
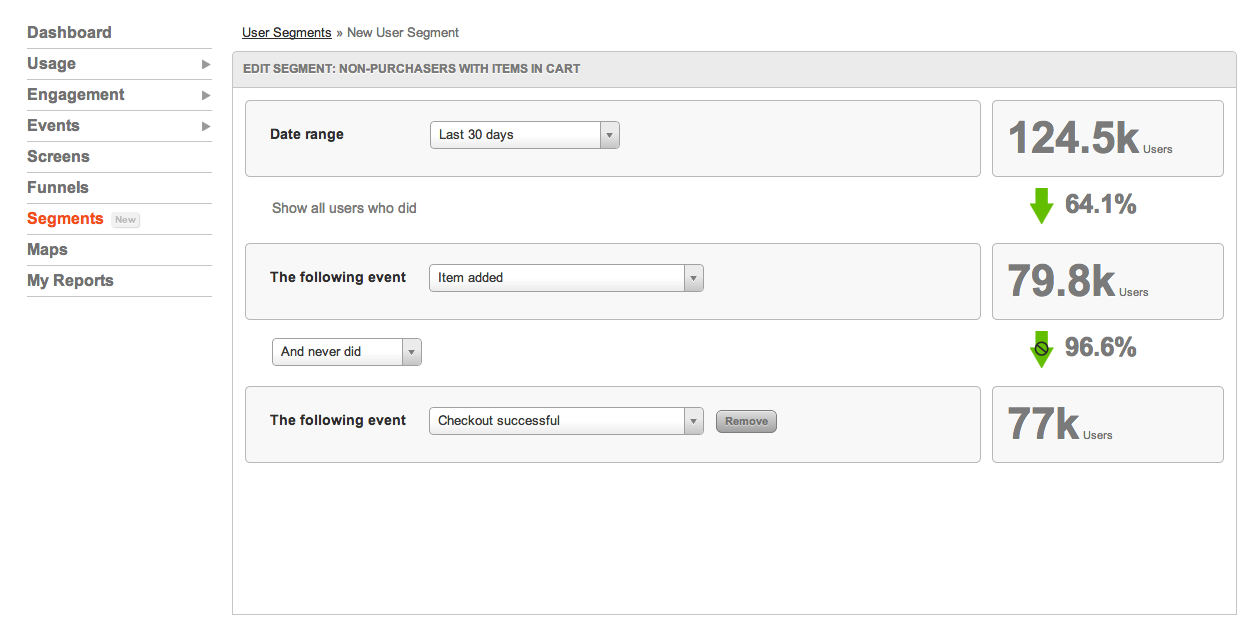
From the Localytics dashboard, navigate to the Segment screen and create a segment of users who, in the past 30 days, did the “item added” event and then never did the “check out successful” event. Name the segment “Non-purchasers with items in cart” and save it. This segment will now track all customers in the past 30 days that have added an item to the shopping cart and never checked out.
Step 2) Build Your Campaign
Now that you’ve built a segment of users who have items in their shopping carts and haven’t checked out, you can target those individuals (and only those) directly.
From the marketing tab, create a new campaign named “Free Shipping – Stale items in cart”. After naming the campaign you have two options on what your campaign will look like, you can upload your layout and message or you can alternatively build a ‘creative right in the Localytics interface. This creative should have a some descriptive text and a call-to-action, prompting users to click through to their shopping cart or a pre-checkout page. Through the Localytics Creative Builder, you can ensure that the typography and color fit within your specific style guidelines.
The goal of this campaign clearly being to increase sales from a segmented audience of interested buyers; where we can be aggressive in when the creative is displayed. You will want to make sure when selecting targeted recipients to use the segment “Non-purchasers with items in cart” which was created in Step 1 above. In addition to using the segment, make sure to target shoppers that are continuing to browse through products to define a qualifying action or event such as “category viewed”. To make sure that we don’t overwhelm the shopper with messaging you’ll want to qualify them for this messaging if they viewed a category four times in the last five days.
Once you know who you’re going to target, you need to decide when to deliver the message via a trigger. You could use an event trigger such as “product viewed”. Using this event as a trigger allows you to not only entice the user to add an item to the cart as they are already interested in a product but will also help facilitate the completion of the purchase within that session.
The conversion event for this campaign will be the “check out successful” event. Setting this event as the conversion event will let you see how many people saw the creative, how many clicked the call-to-action, and how many eventually checked out. Schedule this campaign to run for 365 days, and you’re good to go.
Step 3) Rinse and Repeat
With your campaign up and running, you will begin to see results within the campaign dashboard. You will see the number of impressions, clicks and successful conversions. In monitoring the dashboard, you may see your campaign get many impressions but few clicks. If the trend continues, it may be wise to consider testing your campaign further with an A/B test.
If your campaign is generating lots of impressions and clicks, but few conversions, it may be a sign that your promotion is not enticing enough to push the shopper to purchase and you could reconsider other promotional options.
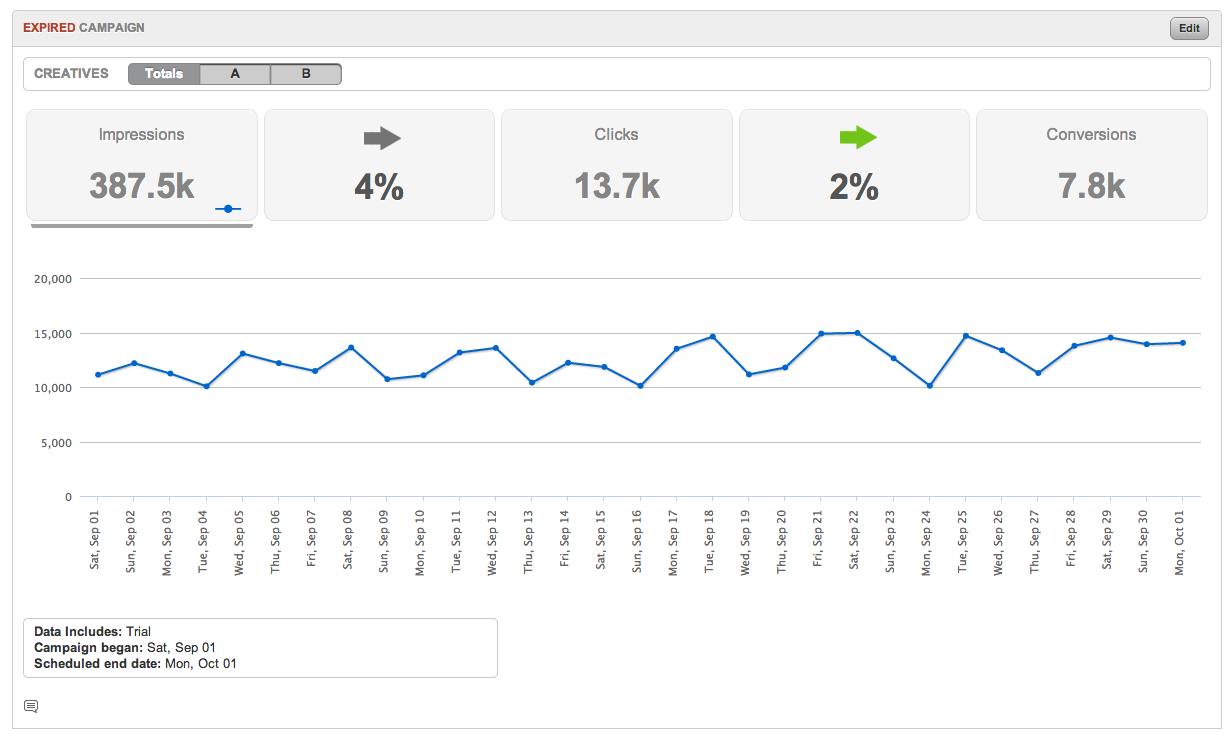
At the end of the day (maybe after a few weeks rather), shopping cart abandonment should be a thing of the past (for the most part). Continue analayzing your metrics for other opportunities to run campaigns such as: unspent reward points, gift card balance, users purchasing as guests rather than registered, limited time / flash sale. ..and, the like.

Kevin is an Online and Mobile Marketing Strategist who has worked with companies of all sizes over the last 6 years. You can follow Kevin on any of the social platforms below.


